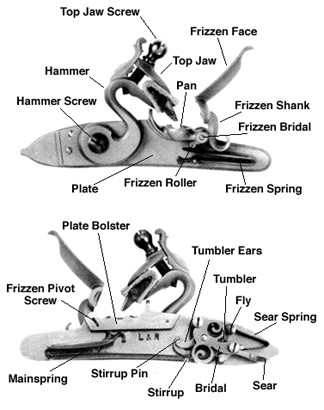
Diagram of Parts – Flintlock
Disassembly/Assembly Instructions with the Durs Egg Flintlock as “Example”.
Tools: 1/4” flat screwdriver / 6” or 8” common pliars / small hammer & center
A vice is handy, but optional
SEQUENCE OF LOCK DISASSEMBLY
- Remove main spring: a. Hammer must be all the way down. b. Compress any spring only the amount necessary. Overstress will collapse or break it. A pair of pliers is best.
- Remove stirrup: Take note that it hangs in the “S” position with small end in the tumbler. Any other position can cause damage! (“Z” position for left hand models only.)
- Remove sear spring.
- Remove sear screw and sear. (When reinstalling, tighten screw only until contact is made between bridle and sear. Then back up 1/4 turn, so sear will operate freely.)
- Remove top bridle screw and bridle.
- To remove the tumbler from the plate:
- Take out hammer screw.
- Using the jaws of a vise, tum the tumbler side of the plate down, with the vise jaws only far enough apart to allow the tumbler to fit freely. Now, using a punch that will just fit the square hammer hole, tap the tumbler out of the hammer. Caution: Keep track of the fly during this operation!
- Remove fly from tumbler. (Take note of the fly’s position regarding its beveled edge. It must be reinstalled in the same way.)
- Remove frizzen spring screw and spring.
- Remove frizzen pivot screw and frizzen.
LOCK REASSEMBLY
- Install frizzen and pivot screw.
- Install frizzen spring and screw.
- Install fly in tumbler. (Remember the position of the beveled edge.)
- Install tumbler in plate.
- Install bridle and top screw.
- Install sear and sear spring. (Remember about screw tension.)
- Install stirrup so that it “hangs” properly.
- Install main spring. (Be sure tumbler is in relaxed position, as if hammer were all the way down.)
- With pliers or properly adjusted vise grips, tum the hammer pole to the “half cock” position. Press the hammer onto the tumbler. Install the hammer screw. If the hammer is properly tight on the tumbler, it should not be necessary to do more than “finger tighten” the hammer screw.
** If you are not certain how to proceed, or if you have any questions, PLEASE don’t hesitate to call.**